DevOps is one of those funny trends where "best practice" can go full circle and end up in a worse place than where we were before we got on the train. Now of course, following DevOps principals can lead to benefits in many scenarios - though I would still argue it’s almost always something that’s best taken in moderation. In my experience, and I believe in the majority of cases, it’s a practice misused and overused.
The problem many developers have is that they think they work for Google, regardless of where they are. For the rest of us, scalability isn’t everything.
Does anyone stop to consider if the time spent building the perfect CI/CD pipeline would be better used developing or designing actual features? Hell, even meeting with a user of the software to gain some understanding of how it’s going to be used. Thinking about what functionality might be useful in the future, which might influence design decisions now. Thinking about where the true value is, what is the real tradeoff between reliability, maintainability, and time to market. The real world can be easily lost in the race for digital perfection and CV decoration.
Having said that, let’s dive right in! I will be going through the process for setting up a build pipeline in Google Cloud Platform for this blog based on Hugo. At this point you should have a Hugo project set up in a repository on Cloud Source Repositories.
First of all set up a storage bucket to host your site.
The ownership of your domain should be verified by Google (instructions).
You then need a CNAME DNS entry pointing your domain to c.storage.googleapis.com.
Example:
NAME                  TYPE     DATA
blog.sayes.cloud      CNAME    c.storage.googleapis.com.
Now you just need to set up a storage bucket with the same name as your domain.
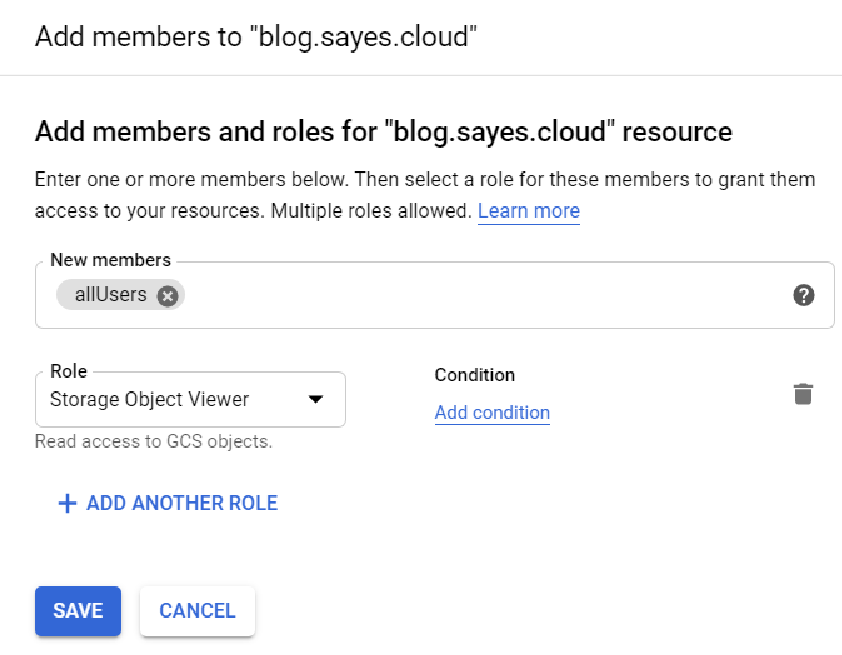
Allow public access by adding a new permission of member allUsers with the role Storage > Storage Object Viewer.
Lastly, change the bucket’s website configuration to use index.html and 404.html.
I will be using Cloud Build for the pipeline, and building the site using a docker image. Before you can do this, you will need to create a Hugo image on Google Container Registry. GCP has a builder for Hugo in their community builders repo, however it is lacking asciidoctor support. I modified the community image to be based on alpine, allowing asciidoctor to be installed via package manager.
FROM busybox as build
ENV HUGO_VERSION=0.69.0
RUN wget -O- https://github.com/gohugoio/hugo/releases/download/v${HUGO_VERSION}/hugo_${HUGO_VERSION}_Linux-32bit.tar.gz | tar zx

FROM alpine
COPY --from=build /hugo /usr/bin
ENTRYPOINT ["/usr/bin/hugo"]
RUN apk --no-cache add asciidoctor
You may then build the image as per Google’s instructions (requires Cloud SDK):
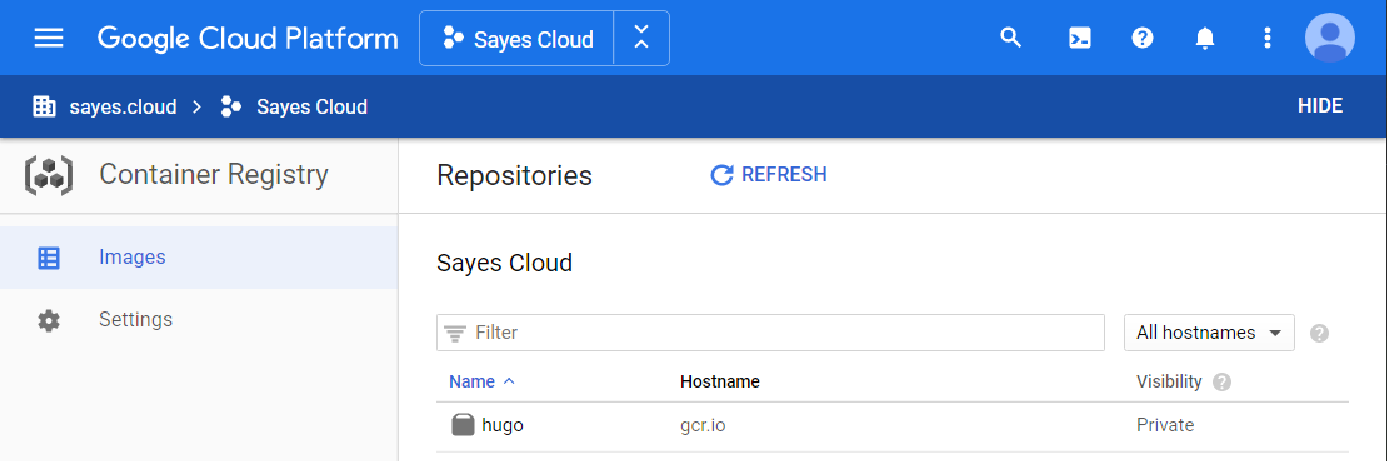
gcloud builds submit . --config=cloudbuild.yamlCheck the hugo image has shown up in Google Container Registry:
You’re now ready to set up your build pipeline configuration! In the root of your repo:
steps:
  - name: gcr.io/cloud-builders/git
    args: ['submodule', 'update', '--init', '--recursive']
  - name: gcr.io/$PROJECT_ID/hugo
  - name: gcr.io/cloud-builders/gsutil
    args: ["-m", "rsync", "-r", "-c", "-d", "public", "gs://$REPO_NAME"]
  - name: gcr.io/cloud-builders/gsutil
args: ["-m", "setmeta", "-h", "Cache-Control:max-age=60", "gs://$REPO_NAME/**.html", "gs://$REPO_NAME/**.xml"]|
Note
|
You may need to change gs://$REPO_NAME to something else if your repository name does not match your bucket/domain name.
|
This build configuration will:
-
Update submodules, fetching themes and any other plugins from their respective repositories
-
Generate the static site using the
hugo(with asciidoctor) image we made previously -
Sync the generated static files (in the
publicfolder) to the bucket. -
Set the Cache-Control policy for
htmlandxmlfiles to expire in 60 seconds (allowing updates to be reflected more quickly).
The final step is setting up the Cloud Build to trigger this pipeline when pushing a commit to master.
Create a new trigger for the event Push to a branch for the repository you are using, filtering to master with the regex ^master$.
For the build configuration, use the Cloud Build configuration that we made previously (cloudbuild.yaml).
After you click create, trigger the build by either pushing to master or clicking Run trigger, and if all goes will your site should be published to the web!
The magic of automation!
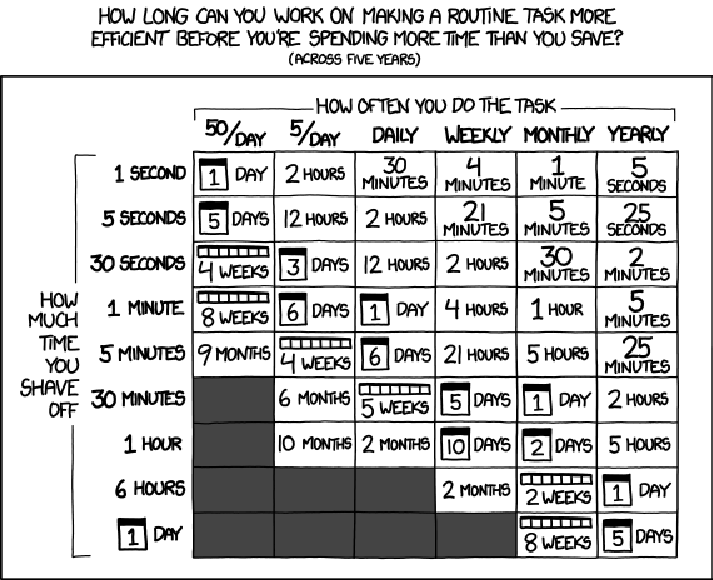
If this pipeline saves you 30 seconds every week for the next 5 years, well… I hope these steps took you less than 2 hours!